Wednesday, January 28, 2009

New underglaze technique

I have acquired four little bottles (flux dispensers) used for putting just a small amount of liquid flux on teeny tiny circuitry. One of my clay teachers, Colleen Riley, showed hers at a recent class. I went to Minnesota Clay last Monday at noon with Angel and I picked up some black, green, and dark blue underglaze to try in these new dispenser bottles.

Here is a bowl onto which I just finished adding some tiny dots and also a thematic blue flower.

Fun with Fiber Clay

So, I decided to plunge in and make some fiber clay. We've been saving up some egg carton type packaging from Christmas presents as well as actual egg cartons. I put 300 grams of this paper into a large bowl and added boiling water to help break down the structure. Soon the entire house had that scrumptious odor of wet card board. After it cooled enough for me to work, I started whipping it with an electric egg beater on high speed. Soon enough I had broken down the structure into a raw pulp. I used a sieve to separate the pulp from the water, although the pulp was still very moist. I weighed my paper mass again and it was up to 800g. I took 1600 grams of recycled clay I was keeping and added enough water to make it slippy, then worked the clay until it was consistent. Now, I mixed the paper pulp into the clay slip and again with my hands this time worked the two mixtures together until they were a uniform consistency. The mixture was a bit too wet to work with at this point, so I set it up in 2" thick 4" high walls on a bat to dry out. I have about 2000 grams of fiber clay with what I figure is about 30% paper mass which will burn out during bisque firing.


I started working on Christian's moon scape lamp shade. It needs to get a little firmer, but I have the basic shape I wanted. It is very easy to change the shape of fiber clay forms with a little water. I want to make this moon look a little more round by tucking in the bottom edge a bit.


Then I decided to make a form for making a plaster cast of a face. This is a thin later of paper clay over a blank plastic harlequin mask. After this dries, I will flip it over and use it to make a plaster cast of the inside. Then I can use the plaster mold to slump as many blank masks as I want.


These blanks can be used to make actually interesting and artistic masks from clay, as well as fun masks for the kids from paper, or paper mache'.


Sculpturally, I can also see that they will be a great starting place for sculpting faces on bronze forms.

Wednesday, January 21, 2009

First ever bronze sculpture.

I went over to school at noon to be in on the pouring of the 10 molds that were ready to go. The forge had blasting away for four hours to get the 100 lb. of bronze in the crucible up to the ~2100 degrees Fahrenheit needed to get a smooth pour. They tested the temperature with a pyrometer and it needed to go up a few hundred degrees still so I went and glazed some pots for awhile. When I came back around 1pm it was getting very close, and the room was getting filled with eager sculptors. At 1:20 they opened the lid on the forge and swung the crucible out, and by 1:30 the pouring was done and the crucible cleaned and empty went back in the forge to cool down. By 1:50 I was able to help pull the molds from the sand pit, and by 2:00pm I was chopping my little dragon from the mold, still blistering hot I quickly brought him to the sink and quenched him in some colder water and worked for the next 45 minutes to remove the last vestiges of plaster from around the bronze. When you make a bronze sculpture, you need to add many extra channels for the bronze and air to flow smoothly to insure you get all your mold filled with no air pockets. This evening I spent 2 and 1/2 hours in the (noisy) cutting and grinding room to get the dragon to the state you see below. I still need to do a little more polishing, carve back in some details that I had to grind off due to imperfections in the mold, then I need to add a patina, and mount it to some kind of craggy rock.

From Crafters of Khnum


The camera was a bit funny trying to get good shots of this very shiny surface, but you cant get an idea of what it looks like. I'll try to add some better photos latter. I think Rane will like it. I'll show it to him in the morning.

Tuesday, January 20, 2009

For Gary... Ann may haunt your dreams...

... or maybe I'm hungry and should eat some lunch. :)

Puppy from Marshall Pottery painted...

When we stopped at Marshall Pottery on the way home from Houston, Christian wanted to get this earthenware puppy. He wanted it painted white with black spots like his puppy box. This is the result. I need to do some touch ups, but he likes it. The black circle around the puppies eye was all Christian's idea.

Sunday, January 18, 2009

My mark revisited, and a petition to bring back Lördag.

Awhile back I posted a drawing of my mark. Today I finally took a photo of it (above). It was made with (small and large) paper clip wire pieces super glued to the back of a stray clear cap I found. To the right is an impression I made in leather hard clay. The letters are younger futhark, which was the alphabet of the Scandinavian people from the 9th century until the 15th century when it evolved into a medieval proto-norse runic writing system. Eventually, as the influence of Christianity grew, the medieval runic alphabet came into competition with the Latin systems used by the clergy. It was and is still common to use runes for calendar's in Scandinavia. We still have remnants in our modern daily lives, such as Tuesday (Tyr's day), Wednesday (Woten's day),Thursday (Thor's day), and Friday (Freyja's day). Saturday in Scandinavian tradition was actually called Lördag (which means bath day -- good idea). And, then Sunday (sun) and Monday (moon) we seemed to share with the rest of Europe.

Saturday, January 17, 2009

My new mug


From New Mug


The inside was glazed with Piepenburg White, and I also painted extra around the top to get the drippy frosting effect breaking over the lip. The outside was sprayed with a thin coat of light green/blue Celadon, then I use a feather brush and whisked a light black glaze from the bottom of the cup upwards. The black over the Celadon must have fluxed some, but I ended up with an interesting effect.

Saturday, January 10, 2009

Some projects in the works...


It's been 3 weeks now since I posted, Christmas has come and gone. We drove to Houston to visit my older sister and her beau. We had an excellent time, and even though my sister's house was stuffed full of people and pets, things went very smoothly. Of note ceramics-wise during the Christmas break is that I received some great presents for my studio, including some great new tools, some slip molding forms, a hefty gift certificate to "Clay World", and some wonderful and very useful books.

So here are some new projects I'm diving into;

1) A 20" hemispherical moonscape made from fiber clay (craters, rough surface). After bisque firing it will become the form for casting a replica of it in bronze. The bronze version will eventually become my son Christian's bed side lamp shade (his room is done in a space theme). The ceramic version I will eventually glaze and fire as well, and use suspended from his ceiling or mounted on his wall (where it will be less likely to be broken).

2) A glaze study of the 30 glazes available at the Minnetonka Center for the Arts on MB clay (new clay for me). I will make a bunch of coffee cups all the same size and shape, then use each glaze as a primary on the exterior, develop a series of surface designs (carving, impressions, stamps, sprigs, etc) then choose a complementary glaze for decoration. I can throw most of these at home and bring them to the Art Center to glaze them. This is akin to doing a tile study, but more interesting than tiles.

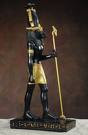
3) I'm currently making a 12" tall bronze dragon, which is small enough in mass to not need an internal mold. I'm shaping it directly in wax, so again, I can skip some steps in the lost wax casting process. I'm building it as a part of a bronze casting class I'm taking from Heidi Hoy at the Minnetonka Center of the Arts. The dragon is almost completed from what I can tell, and when I asked Heidi if it was done she said, "We have a saying around here... We'll let you know when you're done." The photo above is one of Heidi's works.

4) We need to replace the tile in our bathroom. I sat down last week to develop a non-square repeating pattern using a computer graphic design tool. Angel wants the bathroom to have a butterfly motif, so some tiles will be butterfly shaped, and then others will form the shapes between the butterflies. There are about 500 tiles roughly 4" tiles needed for this project.

5) I want to make 12"x12" tiles for the floor in my studio. Again, I want to (lightly) carve and glaze each tile differently to make it look like one large ancient mosaic pattern. I figure the floor tiles will need to be 1/4" thick.

6) I still need to get my kiln's set up and finish the full set up in my basement studio.

It seems overwhelming I know, but I'm not the kind of person who gets discouraged with a mountain of work... I get busy.